Understanding the WordPress hook execution order is one of the most critical skills for any serious developer. When you use add_action() or add_filter(), you are essentially telling WordPress, "Wait until this specific moment, then run my code." But if you choose the wrong moment—for example, trying to check if a user is logged in before the user system has even loaded—your code will fail, often without a clear error message.
In this guide, you will learn the exact sequence of the WordPress lifecycle, how to monitor hooks in real-time, and which hooks are best suited for common development tasks. By mastering the WordPress hook execution order, you can ensure your plugins and themes are efficient, stable, and bug-free.
The Core WordPress Execution Sequence
WordPress follows a strict chronological order when loading. While the exact sequence can vary slightly depending on whether you are viewing the admin dashboard or the front end, the general "vanilla" boot process remains consistent.
At a high level, the process starts with loading the core environment, followed by Must-Use (MU) plugins, then active plugins, the theme, and finally the main WordPress initialization. Here is a breakdown of the primary actions that fire during a typical page load:
- muplugins_loaded: This is the earliest hook available for plugins. It fires after all must-use plugins are loaded.
- plugins_loaded: Fired after all active plugins are loaded. Note that at this stage, the current user is not yet authenticated.
- setup_theme: This fires before the theme is loaded. It is often used for tasks that need to happen before the theme's
functions.phpis parsed. - after_setup_theme: This is the first hook available inside your theme's
functions.php. It's the standard place to register theme support features. - init: One of the most common hooks. By this point, WordPress is fully loaded, and the authenticated user is available. Most plugins use this to initialize their logic.
- wp_loaded: This hook fires once WordPress is fully booted and all resources are ready.
- template_redirect: This is the last hook before WordPress decides which template file to use (e.g.,
single.phpvscategory.php). It's a great place to perform redirects. - wp_head: Fired within the
<head>section of your site. Used for styles, meta tags, and scripts. - wp_footer: Fired just before the closing
</body>tag. - shutdown: The final hook. It fires just before PHP finishes execution.
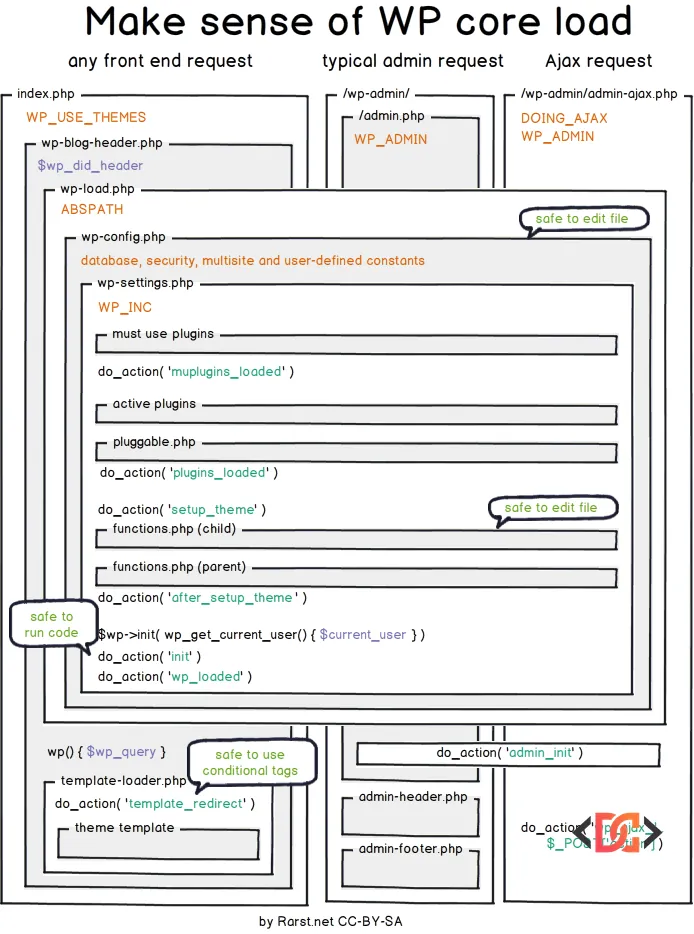
To visualize this complex process, refer to the WordPress load chart below:
How to Track Hook Execution in Real-Time
Sometimes, reading a list isn't enough. You may need to see exactly which hooks are firing on a specific page of your site, especially if you are dealing with complex plugin interactions. You can use a simple Must-Use (MU) plugin to log every action that occurs.
Create a file in your wp-content/mu-plugins/ directory and add the following code:
add_action( 'all', function ( $tag ) {
    static $hooks = array();
    // Only capture do_action / do_action_ref_array hooks.
    if ( did_action( $tag ) ) {
        $hooks[] = $tag;
    }
    if ( 'shutdown' === $tag ) {
        print_r( $hooks );
    }
} );
This script hooks into the special all action, which triggers on every single hook. When the shutdown action finally occurs, it prints a complete array of every action that fired during that request. This is invaluable for debugging why a specific function isn't running when you expect it to.
Analyzing Action Frequency and Order
If you want a cleaner report that shows how many times each action was triggered, you can inspect the $wp_actions global. This is helpful for identifying "heavy" hooks that might be firing dozens of times (like get_sidebar or the_post).
Use this snippet to generate a prettified list at the bottom of your pages:
add_action ( 'shutdown', function() {
    if ( current_user_can( 'manage_options' ) ) {
        foreach ( $GLOBALS['wp_actions'] as $action => $count ) {
            printf( '%s (%d) <br/>' . PHP_EOL, $action, $count );
        }
    }
} );
This will output a list showing each action name and its execution count, restricted only to administrators so your visitors don't see the debug data.
Advanced Debugging Tools for Developers
While custom code is powerful, there are several professional tools that make monitoring the WordPress lifecycle much easier. These tools provide a graphical interface to see exactly what is happening under the hood.
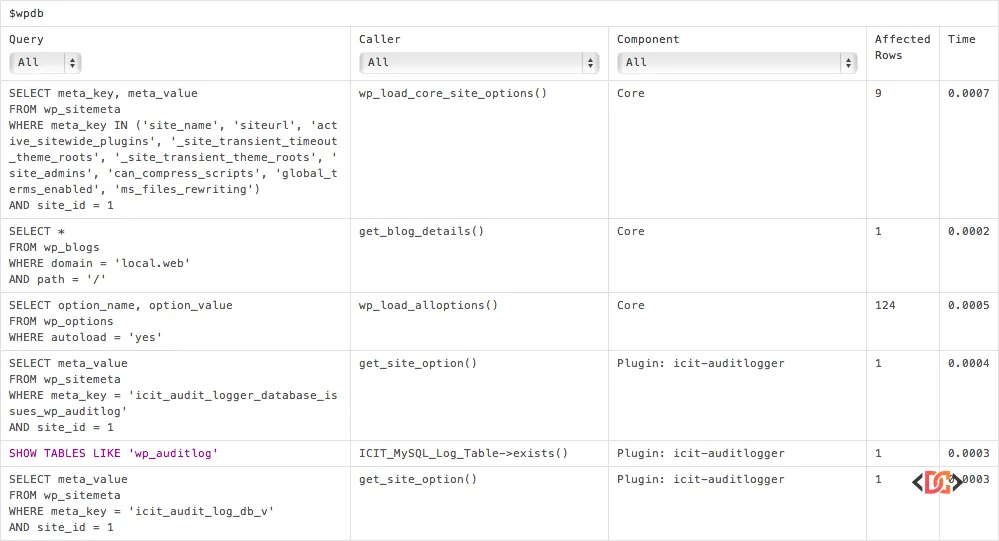
1. Query Monitor
Query Monitor is the gold standard for WordPress debugging. It allows you to view all hooks fired on the current request, along with their priority and the component (plugin or theme) that called them.
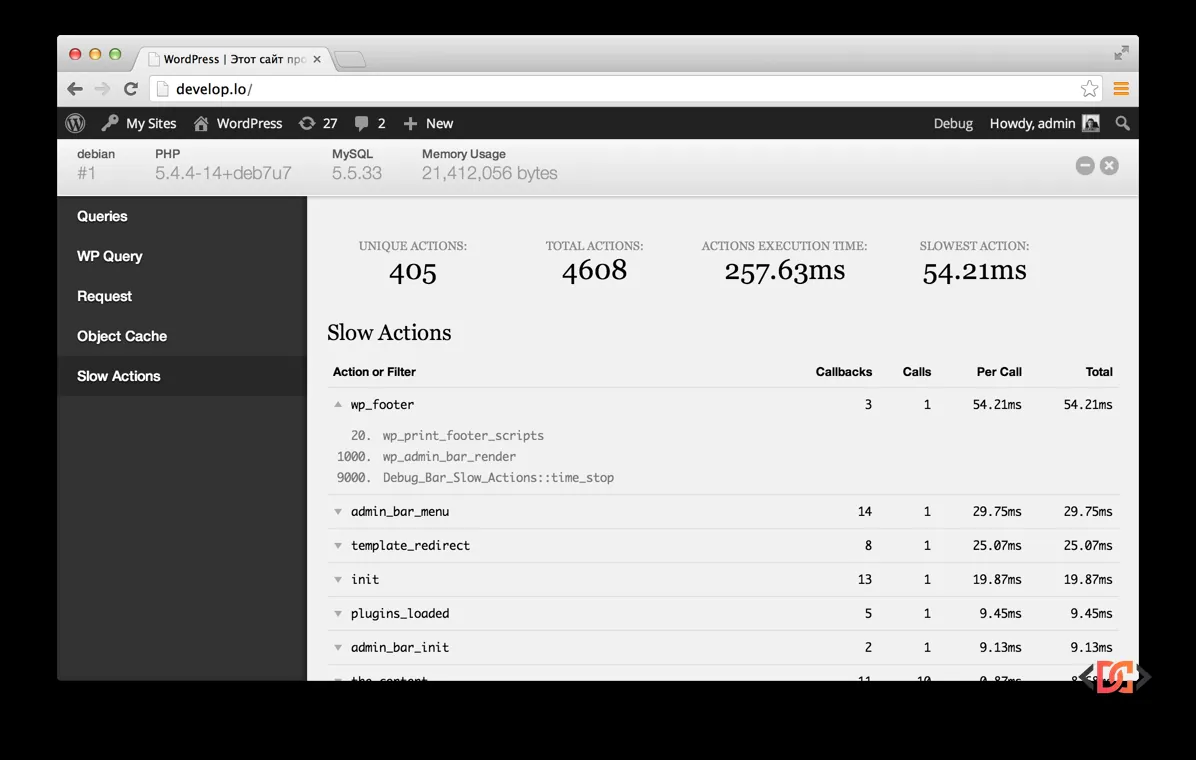
2. Debug Bar and Slow Actions
The Debug Bar plugin, combined with the WP-Debug-Slow-Actions extension, helps you identify which actions are taking the longest to execute. This is essential for performance optimization.
3. Custom URL Hook Reference
You can also create a custom tool that only triggers when you add a specific parameter to your URL. This is useful for testing live sites without leaving debug code active for everyone.
/**
* WordPress Hooks Reference
* Dump all action and filter hooks at the bottom of any page
* by adding ?wp-hooks onto the end of the URL.
*/
function custom_hooks_reference() {
// Only shown for Admin users when ?wp-hooks is added to the URL
$trigger = isset( $_GET['wp-hooks'] ) && current_user_can( 'manage_options' );
if ( ! $trigger ) return;
$filters = array_keys( $GLOBALS['wp_filter'] );
sort( $filters );
$actions = array_keys( $GLOBALS['wp_actions'] );
ob_start();
?>
<section style="background:#fff; padding:20px; border:2px solid #000;">
<h1>WordPress Hooks Reference</h1>
<div style="display:flex;">
<div style="width:50%;">
<h2>Actions</h2>
<?php foreach ( $actions as $hook ) echo "<p>$hook</p>"; ?>
</div>
<div style="width:50%;">
<h2>Filters</h2>
<?php foreach ( $filters as $hook ) echo "<p>$hook</p>"; ?>
</div>
</div>
</section>
<?php
ob_end_flush();
}
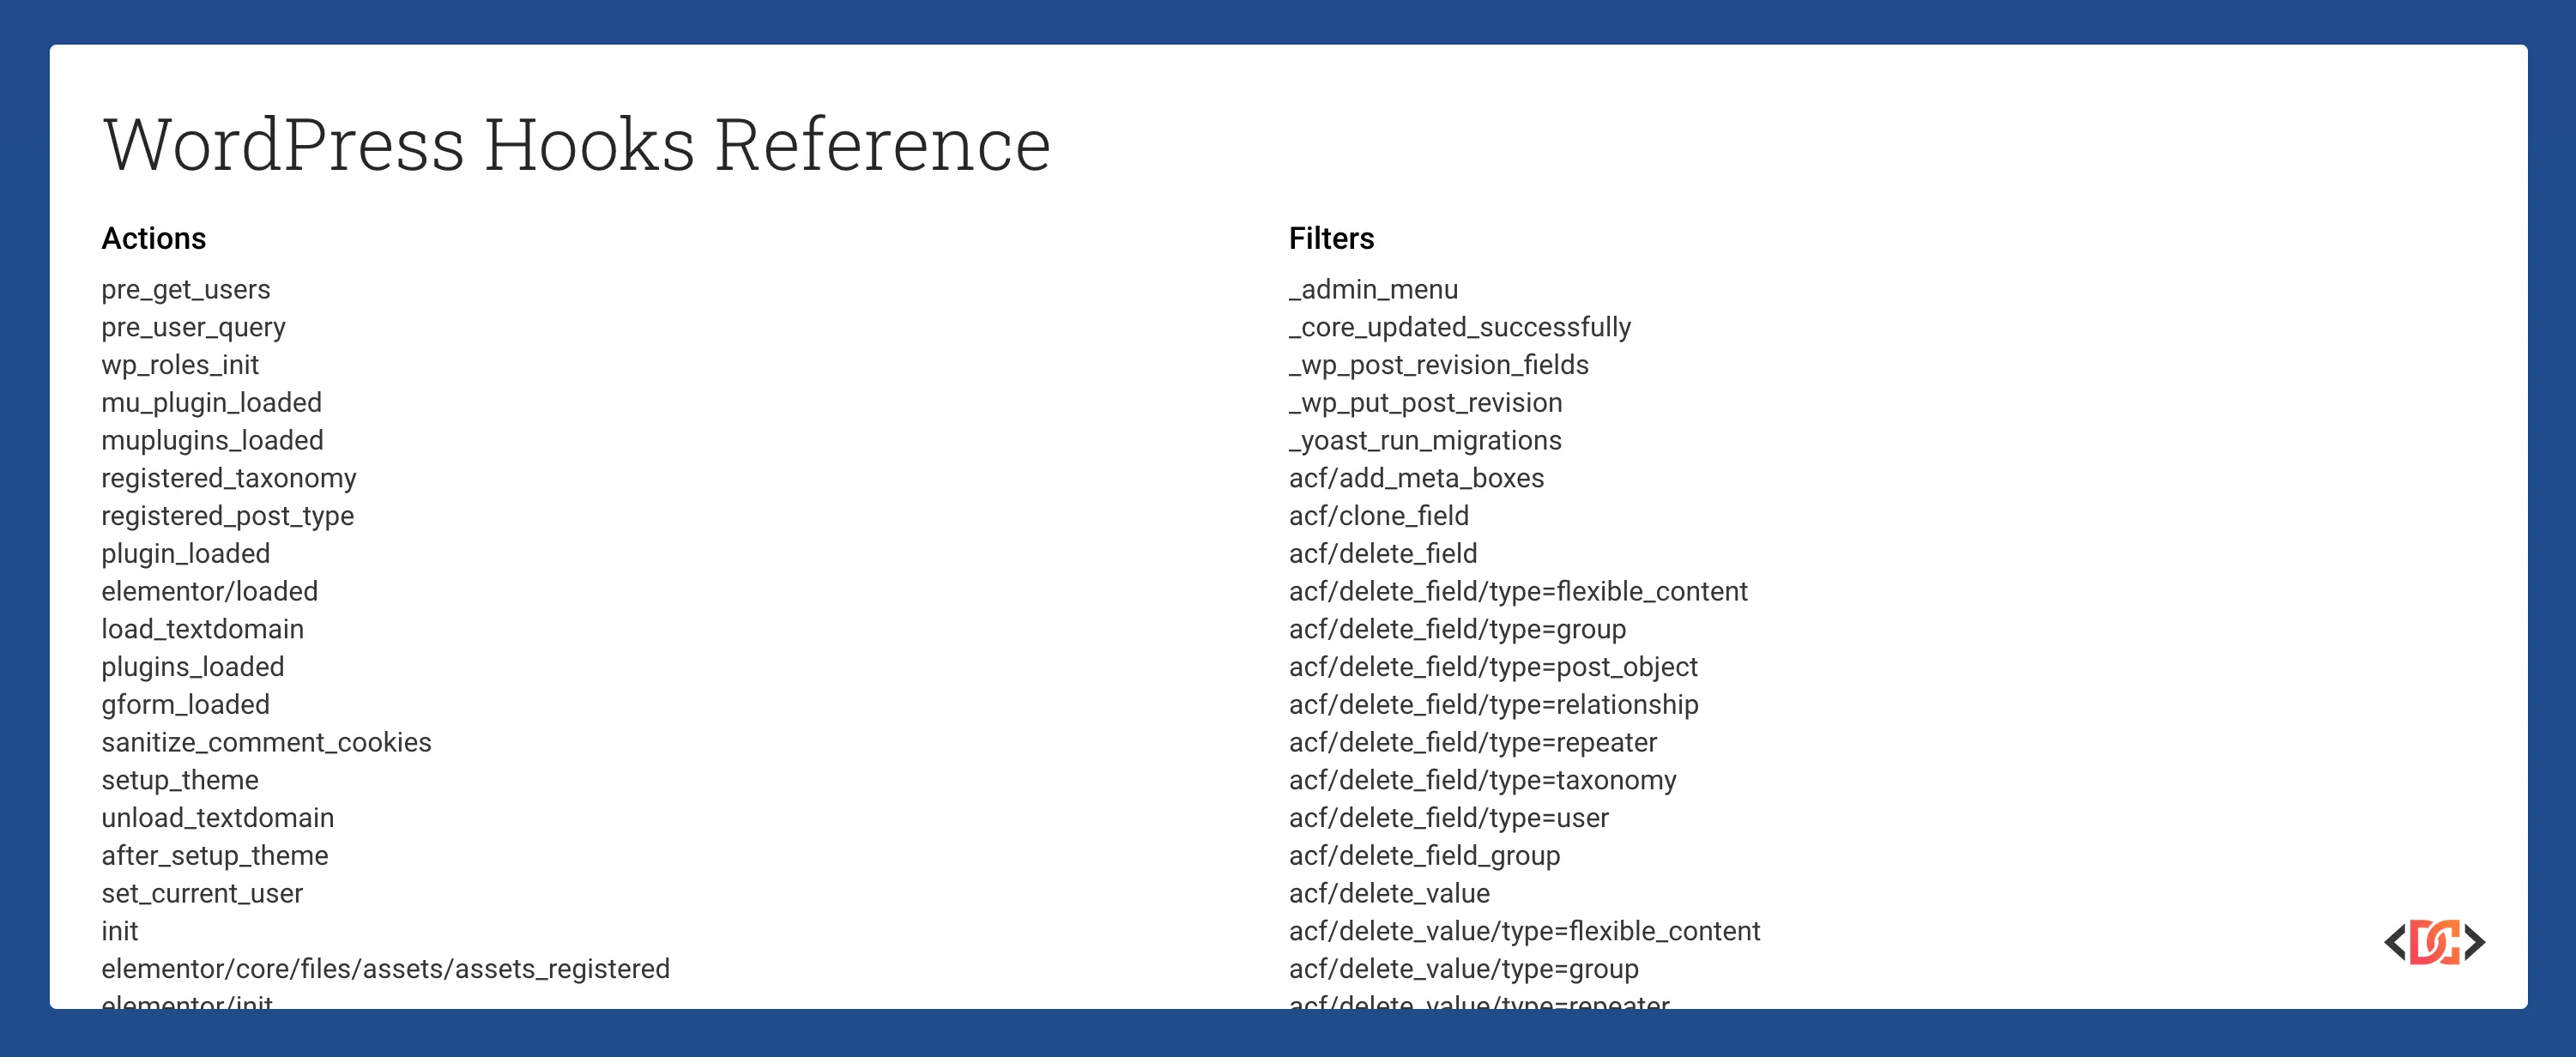
add_action( 'shutdown', 'custom_hooks_reference' );
When you visit your-site.com/?wp-hooks, you'll see a report like this:
Frequently Asked Questions
What is the earliest hook I can use to check if a user is logged in?
The init hook is the earliest reliable point to check user authentication. While plugins_loaded fires earlier, the user's session and cookies haven't been processed yet, so is_user_logged_in() will return false even for logged-in users.
Why does the order of hooks change sometimes?
The sequence of hooks can change based on the type of request. For example, an AJAX request (admin-ajax.php) or a REST API call will fire a different set of hooks than a standard front-end page load. Always use the logging methods mentioned above if you are unsure about a specific context.
Can I change the order in which functions on the same hook run?
Yes. When using add_action( 'hook_name', 'your_function', 10 ), the third parameter is the priority. The default is 10. Lower numbers run earlier (e.g., 5 runs before 10), and higher numbers run later (e.g., 20 runs after 10).
Wrapping Up
Mastering the WordPress hook execution order allows you to write more predictable and efficient code. Whether you are building a simple theme or a complex plugin, knowing exactly when your code enters the lifecycle is the key to professional WordPress development.
Key Takeaways:
- Use plugins_loaded for plugin initialization that doesn't require user data.
- Use init for most general tasks, including custom post types and user checks.
- Leverage tools like Query Monitor to visualize the execution sequence without writing custom code.
- Always remember that the priority parameter in add_action only controls the order within a single hook, not the order of the hooks themselves.