
Navigating long SharePoint Wiki pages can be a challenge for users. When you have a lengthy document or a complex knowledge base, providing a way to jump directly to specific sections is essential for a good user experience. While adding a standard hyperlink is straightforward, creating a "bookmark" or an anchor—a specific spot on the page that a link points to—can feel unintuitive within the SharePoint interface.
You might have noticed the "Bookmark" field in the SharePoint Ribbon and found that it doesn't always behave as expected. In this guide, we will walk through several methods to create functional hyperlink anchors in SharePoint Wiki pages, ranging from using the out-of-the-box UI to advanced JavaScript automation.
Enabling Necessary Features
Before you can utilize the built-in bookmarking tools, you must ensure that your SharePoint environment has the correct features activated. The "Bookmark" field in the Link Ribbon is often grayed out or non-functional if the Publishing features are disabled.
To enable full bookmarking functionality, follow these steps:
1. Site Collection Level: Have a Site Collection Administrator enable the SharePoint Server Publishing Infrastructure feature.
2. Site Level: Once the infrastructure is ready, activate the SharePoint Server Publishing feature on the specific site where your Wiki resides.
Once these are active, the SharePoint Ribbon will offer more robust options for managing links and their destinations.
Method 1: The Standard Ribbon Approach
If you prefer to stay within the visual editor and avoid touching any code, the Ribbon provides a structured way to create bookmarks.
Step 1: Create the Destination (The Anchor)
First, you need to tell SharePoint where the jump should land.
- Highlight the text that you want to serve as the destination (e.g., a section heading).
- Go to the Insert tab and select Link, then choose From Address.
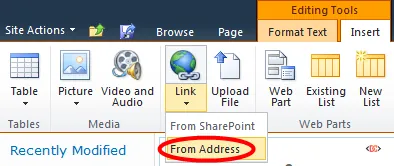
- In the address field, paste the URL of the current page you are editing.
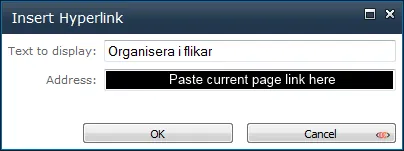
- Once the link is created, click on it to activate the Link tab in the Ribbon. Look for the Bookmark box and type your desired anchor name (e.g.,
Section1). Do not use a hash (#) symbol here.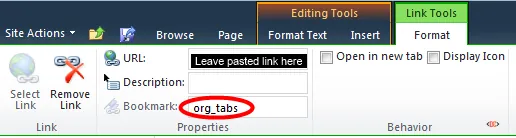
Step 2: Create the Source (The Jump Link)
Now that the destination is set, you need to create the link that leads there.
- Highlight the text that should act as the trigger (e.g., "Jump to Section 1").
- Go to Insert > Link > From Address.
- In the Address field, type the name of your bookmark preceded by a hash mark (e.g.,
#Section1).
- Save the page.
Method 2: The "Self-Link" Anchor (No Refresh)
A common complaint with Method 1 is that the anchor itself becomes a clickable link that might reload the page or move the focus if clicked. To create a "cleaner" anchor that doesn't behave like a link, you can use a slightly different approach in the Address field.
- Highlight your destination text.
- Insert a link From Address.
- In the Address field, simply enter a single hash
#followed by your anchor name (e.g.,#MyTarget).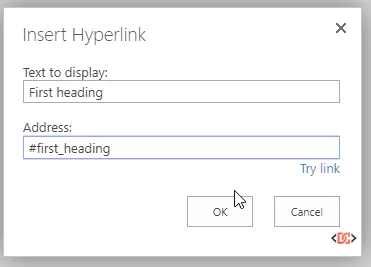
- In the Bookmark property in the Ribbon, enter the name again without the hash (
MyTarget).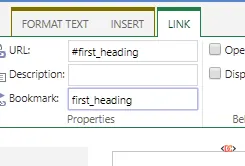
By using #MyTarget as the address, the browser treats the destination as a local reference, preventing unnecessary page refreshes while still allowing the "Jump Link" to find its target.
Method 3: Manual HTML Anchors
If you find the SharePoint Ribbon interface cumbersome or if it continues to "complain" about your inputs, the most reliable method is to use the "Edit Source" tool. This is the preferred method for developers who want a clean, invisible anchor.
- Edit the Wiki page and click Edit Source in the Ribbon.
- Find the location where you want the user to land.
- Insert the following HTML tag:
<a name="MyAnchor"></a>
- Find the text you want to use as the trigger and wrap it in a link tag, or use the Ribbon to link to
#MyAnchor. The full URL approach also works if you are linking from a different page:
<a href="http://mysite.com/wiki/page.aspx#MyAnchor">Jump to Anchor</a>
Method 4: Advanced Automation via JavaScript
For large Wiki sites where users frequently need to create anchors but find the HTML editor intimidating, you can use a JavaScript snippet to automate the process. This method uses a "token" (like /__) that the script converts into a real anchor tag upon page load.
The Script
Add this code to a Content Editor Web Part or your site's master page:
function WikiLinks(defaulthyperlink){
    if(!defaulthyperlink)
          defaulthyperlink = "#";
    $(".ms-wikicontent a").each(function(){
        var thishref = $(this).attr('href');
        if(thishref.indexOf('/__') >= 0){
            thisanchor = String(thishref).substring(3, String(thishref).length);
            $(this).attr('name', thisanchor );
            $(this).attr('href',defaulthyperlink);
        }
    });
}
How to Use It
- The user creates a normal hyperlink using the Ribbon.
- In the address field, they type
/followed by two underscores and their anchor name, for example:/__myanchor. - When the page loads, the script finds any link starting with
/__, removes the link behavior, and turns that element into a named anchor (<a name="myanchor"></a>).
Note: This script must be called after the UI has fully loaded. It is best suited for internal page jumps.
Frequently Asked Questions
Why is the Bookmark field grayed out in my Ribbon?
This usually happens because the SharePoint Server Publishing features are not activated. If you cannot activate these features, you will need to use the Manual HTML Anchor method described above.
Can I link to an anchor on a different SharePoint page?
Yes. Simply take the full URL of the destination page and append #YourAnchorName to the end of it. For example: https://contoso.sharepoint.com/sites/wiki/SitePages/Home.aspx#Section2.
Do anchors work in the SharePoint Mobile App?
In classic Wiki pages, anchors generally work as long as the browser supports fragment identifiers (the # part of the URL). However, performance can vary depending on how the mobile view renders the Wiki content.
Wrapping Up
Creating a seamless navigation experience in SharePoint Wiki pages doesn't have to be a struggle with "messy HTML." Whether you choose the standard Ribbon approach, the self-link technique, or a custom JavaScript solution, providing anchors will make your content much more accessible to your team.
For most users, Method 2 (The Self-Link) offers the best balance between ease of use and functional stability. If you are managing a high-volume Wiki, consider the JavaScript Automation to simplify the process for your contributors.