Running Apache Solr is a fundamental requirement for any modern Sitecore implementation. Whether you are working on an older Sitecore 8.1 instance or a modern Sitecore 10+ Headless environment, Solr powers the content search API and the underlying indexes that make your site functional.
While starting Solr manually via the command line is acceptable for a quick local test, it is not a viable strategy for professional development or production environments. You need a way to ensure Solr starts automatically when the server reboots and remains running in the background. In this guide, you will learn multiple ways to set up Solr as a Windows service, from using the popular NSSM tool to fully automated PowerShell scripts.
The Industry Standard: Using NSSM (Non-Sucking Service Manager)
The most popular and reliable method used by Sitecore developers is NSSM (Non-Sucking Service Manager). It is a service helper that allows you to wrap any executable, including Solr’s batch files, into a standard Windows service.
To get started, download NSSM and place the executable in your system PATH. Once ready, follow these steps:
- Open an administrative command prompt.
- Navigate to your Solr directory.
- Run the following command:
nssm install solr
This command opens a GUI that allows you to configure the service details. You will need to point the "Path" to your solr.cmd file and set the "Startup directory" to your Solr bin folder.
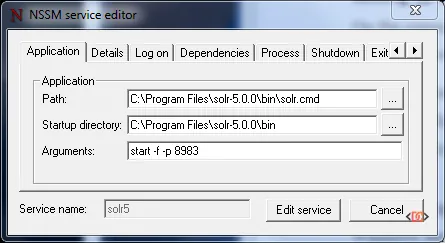
You can also add parameters such as -f (to run in the foreground within the service wrapper) and -p 8983 to specify the port. This ensures that if the process dies, NSSM will automatically attempt to restart it.
Automating Solr Setup with PowerShell and SSL
Starting with Sitecore 9, Solr must be secured via HTTPS. Manually configuring SSL certificates and services can be time-consuming. Using a PowerShell script is the most efficient way to handle the installation, certificate generation, and service creation in one go.
Below is a comprehensive script that handles the download, SSL configuration using self-signed certificates, and the service installation using NSSM. This is particularly useful for developers setting up local environments frequently.
Param(
    $solrVersion = "6.6.2",
    $installFolder = "c:\solr",
    $solrPort = "8983",
    $solrHost = "solr",
    $solrSSL = $true,
    $nssmVersion = "2.24",
    $JREVersion = "1.8.0_151"
)

$JREPath = "C:\Program Files\Java\jre$JREVersion"
$solrName = "solr-$solrVersion"
$solrRoot = "$installFolder\$solrName"
$nssmRoot = "$installFolder\nssm-$nssmVersion"
$solrPackage = "https://archive.apache.org/dist/lucene/solr/$solrVersion/$solrName.zip"
$nssmPackage = "https://nssm.cc/release/nssm-$nssmVersion.zip"
$downloadFolder = "~\Downloads"

## Verify elevated
$elevated = [bool](([System.Security.Principal.WindowsIdentity]::GetCurrent()).groups -match "S-1-5-32-544")
if($elevated -eq $false)
{
    throw "In order to install services, please run this script elevated."
}

function downloadAndUnzipIfRequired
{
    Param(
        [string]$toolName,
        [string]$toolFolder,
        [string]$toolZip,
        [string]$toolSourceFile,
        [string]$installRoot
    )

    if(!(Test-Path -Path $toolFolder))
    {
        if(!(Test-Path -Path $toolZip))
        {
            Write-Host "Downloading $toolName..."
            Start-BitsTransfer -Source $toolSourceFile -Destination $toolZip
        }

        Write-Host "Extracting $toolName to $toolFolder..."
        Expand-Archive $toolZip -DestinationPath $installRoot
    }
}

# download & extract archives
$solrZip = "$downloadFolder\$solrName.zip"
downloadAndUnzipIfRequired "Solr" $solrRoot $solrZip $solrPackage $installFolder

$nssmZip = "$downloadFolder\nssm-$nssmVersion.zip"
downloadAndUnzipIfRequired "NSSM" $nssmRoot $nssmZip $nssmPackage $installFolder

# Ensure Java environment variable
$jreVal = [Environment]::GetEnvironmentVariable("JAVA_HOME", [EnvironmentVariableTarget]::Machine)
if($jreVal -ne $JREPath)
{
    Write-Host "Setting JAVA_HOME environment variable"
    [Environment]::SetEnvironmentVariable("JAVA_HOME", $JREPath, [EnvironmentVariableTarget]::Machine)
}

# Handle SSL if required
if($solrSSL -eq $true)
{
    $existingCert = Get-ChildItem Cert:\LocalMachine\Root | where FriendlyName -eq "$solrName"
    if(!($existingCert))
    {
        Write-Host "Creating & trusting an new SSL Cert for $solrHost"
        $cert = New-SelfSignedCertificate -FriendlyName "$solrName" -DnsName "$solrHost" -CertStoreLocation "cert:\LocalMachine" -NotAfter (Get-Date).AddYears(10)
        $store = New-Object System.Security.Cryptography.X509Certificates.X509Store "Root","LocalMachine"
        $store.Open("ReadWrite")
        $store.Add($cert)
        $store.Close()
        $cert | Remove-Item
    }

    if(!(Test-Path -Path "$solrRoot\server\etc\solr-ssl.keystore.pfx"))
    {
        Write-Host "Exporting cert for Solr to use"
        $cert = Get-ChildItem Cert:\LocalMachine\Root | where FriendlyName -eq "$solrName"
        $certStore = "$solrRoot\server\etc\solr-ssl.keystore.pfx"
        $certPwd = ConvertTo-SecureString -String "secret" -Force -AsPlainText
        $cert | Export-PfxCertificate -FilePath $certStore -Password $certpwd | Out-Null
    }
}

# install the service
$svc = Get-Service "$solrName" -ErrorAction SilentlyContinue
if(!($svc))
{
    Write-Host "Installing Solr service"
    &"$installFolder\nssm-$nssmVersion\win64\nssm.exe" install "$solrName" "$solrRoot\bin\solr.cmd" "-f" "-p $solrPort"
    $svc = Get-Service "$solrName" -ErrorAction SilentlyContinue
}

if($svc.Status -ne "Running")
{
    Write-Host "Starting Solr service"
    Start-Service "$solrName"
}
This script ensures that the JAVA_HOME environment variable is correctly set, which is a common point of failure for Solr services.
Using the Bitnami Solr Stack
If you prefer a more "packaged" approach, the Bitnami Solr Stack is an excellent alternative. It provides an opinionated structure that is consistent across different environments. Bitnami includes a utility script specifically for service installation.
Once Bitnami is installed, locate the scripts directory (usually C:\Bitnami\solr-x.x.x\apache-solr\scripts). You will find a file called serviceinstall.bat. You can run this file to register Solr as a service automatically.
For more control, you can customize the .bat file to increase the memory allocation (JVM Heap size), which is essential for larger Sitecore indexes. Look for the ++JvmOptions section in the script to adjust -Xms and -Xmx values:
"C:\Bitnami\solr-4.10.3-0/apache-solr\scripts\prunsrv.exe" //IS//solr --DisplayName="solr" --Install="C:\Bitnami\solr-4.10.3-0/apache-solr\scripts\prunsrv.exe" --LogPath="C:\Bitnami\solr-4.10.3-0/apache-solr\logs" --LogLevel=Debug --StdOutput=auto --StdError=auto --StartMode=Java --StopMode=Java --Jvm=auto ++JvmOptions=-DSTOP.PORT=8079 ++JvmOptions=-DSTOP.KEY=s3crEt ++JvmOptions=-Djetty.home="C:\Bitnami\solr-4.10.3-0/apache-solr" ++JvmOptions=-Dsolr.solr.home="C:\Bitnami\solr-4.10.3-0/apache-solr/solr" --Jvm=auto ++JvmOptions=-Djetty.logs="C:\Bitnami\solr-4.10.3-0/apache-solr\logs" --JavaHome="C:\Program Files\Java\jre1.8.0_91" ++JvmOptions=-XX:MaxPermSize=256M ++JvmOptions=-Xms5120M ++JvmOptions=-Xmx5120M --Classpath="C:\Bitnami\solr-4.10.3-0/apache-solr\lib\*";"C:\Bitnami\solr-4.10.3-0/apache-solr\start.jar" --StartClass=org.eclipse.jetty.start.Main ++StartParams="C:\Bitnami\solr-4.10.3-0/apache-solr\etc\jetty.xml" --StopClass=org.eclipse.jetty.start.Main ++StopParams=--stop ++StopParams=-DSTOP.PORT=8079 ++StopParams=-DSTOP.KEY=s3crEt --Startup=auto
After customizing, run serviceinstall.bat INSTALL from an admin command prompt to finalize the setup.

Running Multiple Solr Instances
In some scenarios, you might need to run two different versions of Solr on the same machine (e.g., maintaining an older Sitecore 8 project while developing a new Sitecore 10 project).
If you are using Apache Tomcat to host Solr, you can install a second instance of the service by using the service.bat file with a unique name:
C:\> service.bat install SolrTomcat2
You must then update the solr.xml or the connector configuration in Tomcat to use a different port (e.g., 9090 instead of 8983) to avoid conflicts:
hostPort="9090"
Frequently Asked Questions
Why is my Solr service failing to start after a reboot?
The most common reason is that the JAVA_HOME environment variable is not set at the System level, or the service account does not have permissions to the Java executable. Ensure Java is in the system PATH and JAVA_HOME points to the correct JRE/JDK folder.
How do I increase the memory for my Solr service?
If using NSSM, you can add the memory arguments in the "App parameters" field. If using a direct service wrapper like prunsrv, you must update the ++JvmOptions with -Xmx (maximum heap) and -Xms (initial heap) values, such as -Xmx4g for 4GB of RAM.
Can I run Solr as a service without third-party tools?
While you can use the native Windows sc create command, it is difficult to configure correctly for Java applications that require complex batch file execution. Tools like NSSM or the Apache Commons Daemon (prunsrv) are highly recommended because they handle the lifecycle of the Java process much more gracefully.
Wrapping Up
Setting up Solr as a Windows service is a critical step in professionalizing your Sitecore development environment. For most developers, NSSM provides the perfect balance of simplicity and reliability. However, if you are looking for a repeatable, scriptable setup—especially one that handles the modern requirement of SSL—the PowerShell approach is superior.
Key Takeaways:
- NSSM is the easiest way to wrap solr.cmd into a service.
- SSL is mandatory for Sitecore 9+; automate this with PowerShell scripts to save time.
- Memory Management is vital; always check your JVM heap settings for production-grade indexes.
- Environment Variables like JAVA_HOME must be set at the system level for services to initialize correctly.