When building custom layouts in Drupal, you often need to render image fields outside of the standard content area. Whether you are building a custom hero section or a unique slideshow in page.html.twig, you will quickly realize that simply printing the image URL isn't enough. To ensure your site remains performant and visually consistent, you must apply a specific Drupal image style to your raw field data.
In this guide, you will learn the most effective methods to render image fields with custom styles directly within your Twig templates. We will cover core render arrays, the popular Twig Tweak module, and how to handle responsive images for modern web standards.
Understanding the Image Style Challenge
By default, when you access a node object in a template like page.html.twig, the image field contains the raw file URI. If you simply use file_url(node.field_image.entity.uri.value), Drupal will output the original, high-resolution image. This is detrimental to performance and SEO.
To fix this, you need to tell Drupal to process that URI through the Image Style system. This generates a derivative image (a cropped or resized version) and returns the correct path. Let's look at the different ways to achieve this.
Method 1: Using Core Render Arrays
The most robust way to handle images in Drupal without installing additional modules is to use a render array. This method allows you to pass the URI, alt text, and even custom CSS classes directly to Drupal's theme engine.
Replace your standard <img> tag with the following logic:
{% set imagestyle = {
  '#theme':      'image_style',
  '#style_name': 'medium',
  '#uri':        node.field_slides[key].entity.uri.value,
  '#alt':        node.field_slides[key].alt,
  '#attributes': { class: 'swiper-image' },
} %}

{{ imagestyle }}
In this example, replace 'medium' with the machine name of your custom image style. This approach is highly recommended because it utilizes Drupal's internal caching and ensures that the alt text is handled correctly for accessibility.
Method 2: The Twig Tweak Approach
If you have the Twig Tweak module installed, your code becomes significantly cleaner. Twig Tweak adds a custom filter that allows you to generate an image style URL directly from a URI.
<img src="{{ node.field_slides[key].entity.uri.value | image_style('thumbnail') }}" alt="{{ node.field_slides[key].alt }}" />
This is much more concise and feels natural to developers coming from other templating engines. If you are working with paragraphs or nested entities, you can use a similar syntax:
<img src="{{ item.entity.field_image.entity.uri.value | image_style('large') }}" alt="{{ item.entity.field_image.alt }}" />
Method 3: Implementing Responsive Images
For modern, mobile-first websites, a single image style often isn't enough. You may want to use Drupal's Responsive Image module. Similar to the standard image style, you can trigger a responsive image render array in Twig:
{% set responsiveimagestyle = {
    '#theme': 'responsive_image',
    '#responsive_image_style_id': 'hero_responsive_style',
    '#uri': node.field_slides[key].entity.uri.value,
    '#attributes': { class: 'swiper-image', alt: node.field_slides[key].alt },
} %}

{{ responsiveimagestyle }}
This will output a <picture> tag with multiple srcset sources based on the breakpoints you have configured in the Drupal UI.
Method 4: Handling Nested Entities (Paragraphs & Media)
Sometimes the image you need isn't directly on the node but is nested within a Paragraph or a Media entity. To access these, you may need to traverse the entity relationship. If you are working within a paragraph template but need an image from the parent entity, use the getParentEntity() method:
{% set paragraph_parent = paragraph.getParentEntity() %}

{% set responsiveimagestyle = {
    '#theme': 'responsive_image',
    '#responsive_image_style_id': 'hero_responsive',
    '#uri': paragraph_parent.field_image.entity.field_media_image.entity.fileuri,
    '#attributes': { class: 'swiper-image', alt: paragraph_parent.field_image.entity.field_media_image.alt },
} %}
Method 5: Using the UI-First Approach
If you prefer to keep your Twig files light, you can leverage Drupal's display settings. A newer field formatter called "URL to image" allows you to select an image style directly in the "Manage Display" tab of your content type.
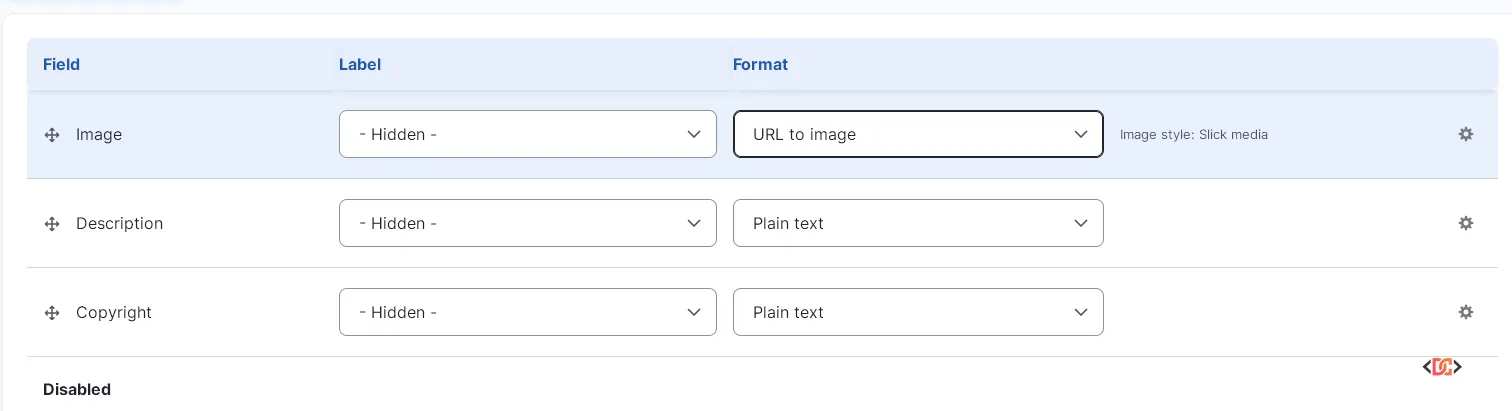
Once configured in the UI, you can simply render the field in Twig, and Drupal will apply the settings automatically:
{{ content.field_slides }}
Frequently Asked Questions
Why does my page crash (500 error) when I use dump() on an image field?
Image fields in Drupal are complex objects containing circular references. When you use dump() on a large entity object like a node or a media field, the PHP memory limit is often exceeded, or the recursion depth causes a crash. Instead, try dumping specific properties, such as {{ dump(node.field_image.target_id) }}.
Can I use Twig Tweak to render an entire view mode?
Yes! This is often better for maintenance. If you create a view mode called 'Compact', you can render it using: {{ node.field_image|view('compact') }}. This allows you to change image styles in the Drupal UI later without touching your code.
Does the image_style filter work with SVG files?
SVG files do not have pixel dimensions, so Drupal's standard GD toolkit cannot "resize" them. However, if you use the Twig Tweak view filter or a proper render array, Drupal will typically return the original SVG path gracefully.
Wrapping Up
Rendering image styles in Drupal Twig templates doesn't have to be complicated. For quick fixes, the Twig Tweak module is the most developer-friendly option. However, for core-heavy projects, using render arrays with #theme: 'image_style' provides the most control and follows Drupal's best practices for performance and accessibility.
By ensuring every image on your site uses a defined image style, you improve page load speeds, boost your SEO rankings, and provide a much better experience for your users.