
When building Lightning Web Components (LWC) for standard Salesforce record pages, accessing the current record's ID is as simple as using the @api recordId decorator. However, when you move that same component into Salesforce Experience Cloud (formerly Communities), you might find that recordId returns undefined.
This is a common hurdle for developers transitioning from internal CRM development to customer-facing portals. In this guide, you will learn the exact configuration required to ensure your Salesforce LWC correctly identifies the recordId within the Experience Builder environment.
Understanding the recordId Challenge in Experience Cloud
In a standard Lightning Record Page, Salesforce automatically injects the ID of the record being viewed into any component that declares a public recordId property. Experience Cloud operates differently. Because community pages can be highly customized and may host multiple components with different data requirements, the platform requires an explicit handshake between the page and your component.
Simply adding the component to a record detail page in the Experience Builder isn't always enough. You must explicitly tell the Experience Builder to pass the page's ID variable into your component’s property.
Step 1: Configure Your Component Metadata
To make your component aware of the record context in a community, you must first update the js-meta.xml file. You need to target lightningCommunity__Default and define a property specifically for the record ID.
One common mistake is trying to set a default value of {!recordId} directly in the XML file. Often, the builder fails to parse this correctly as a default. Instead, you should define the property and leave the value assignment for the Experience Builder UI.
Here is the recommended configuration for your *.js-meta.xml file:
<?xml version="1.0" encoding="UTF-8"?>
<LightningComponentBundle xmlns="http://soap.sforce.com/2006/04/metadata">
    <apiVersion>58.0</apiVersion>
    <isExposed>true</isExposed>
    <masterLabel>ContractorSearch</masterLabel>
    <description>Searches for contractors for a given set of criteria</description>
    <targets>
        <target>lightning__RecordPage</target>
        <target>lightningCommunity__Page</target>
        <target>lightningCommunity__Default</target>
    </targets>
    <targetConfigs>
        <targetConfig targets="lightning__RecordPage">
            <objects>
                <object>Requisition__c</object>
            </objects>
        </targetConfig>
        <targetConfig targets="lightningCommunity__Default">
            <property
                name="recordId"
                type="String"
                label="Record ID"
                description="Enter {!recordId} in the Experience Builder to pass the current record's ID."
            />
        </targetConfig>
    </targetConfigs>
</LightningComponentBundle>
Step 2: Implement the JavaScript Controller
In your JavaScript file, you must use the @api decorator to make the recordId property public. This allows the Experience Builder to "see" the property and inject a value into it.
Once the recordId is available, you can use it to wire data, such as fetching record details using the getRecord wire adapter. This is more efficient than writing custom Apex for simple data retrieval.
import { LightningElement, api, wire, track } from 'lwc';
import { getRecord } from 'lightning/uiRecordApi';
import STATE_FIELD from '@salesforce/schema/Requisition__c.State__c';

// Import other necessary fields
const requisitionFields = [
    STATE_FIELD,
];

export default class ContractorSearch extends LightningElement {
    @api recordId;
    @track requisition;

    @wire(getRecord, { recordId: '$recordId', fields: requisitionFields })
    getRequisition({ error, data }) {
        if (data) {
            this.requisition = data;
            console.log('Record Data:', data);
        } else if (error) {
            console.error('Error fetching record:', error);
        }
    }
}
By using the syntax '$recordId', you make the wire service reactive. This means if the recordId changes (for example, if the user navigates to a different record on the same page template), the wire service will automatically re-run and fetch the new data.
Step 3: Map the Property in Experience Builder
This is the most critical step. After deploying your code, navigate to the Experience Builder for your site.
- Open the page where your component is located (usually a Record Detail page).
- Click on your component to open its property editor.
- You will see the "Record ID" field that you defined in your
targetConfig. - Enter the literal string
{!recordId}into that field.
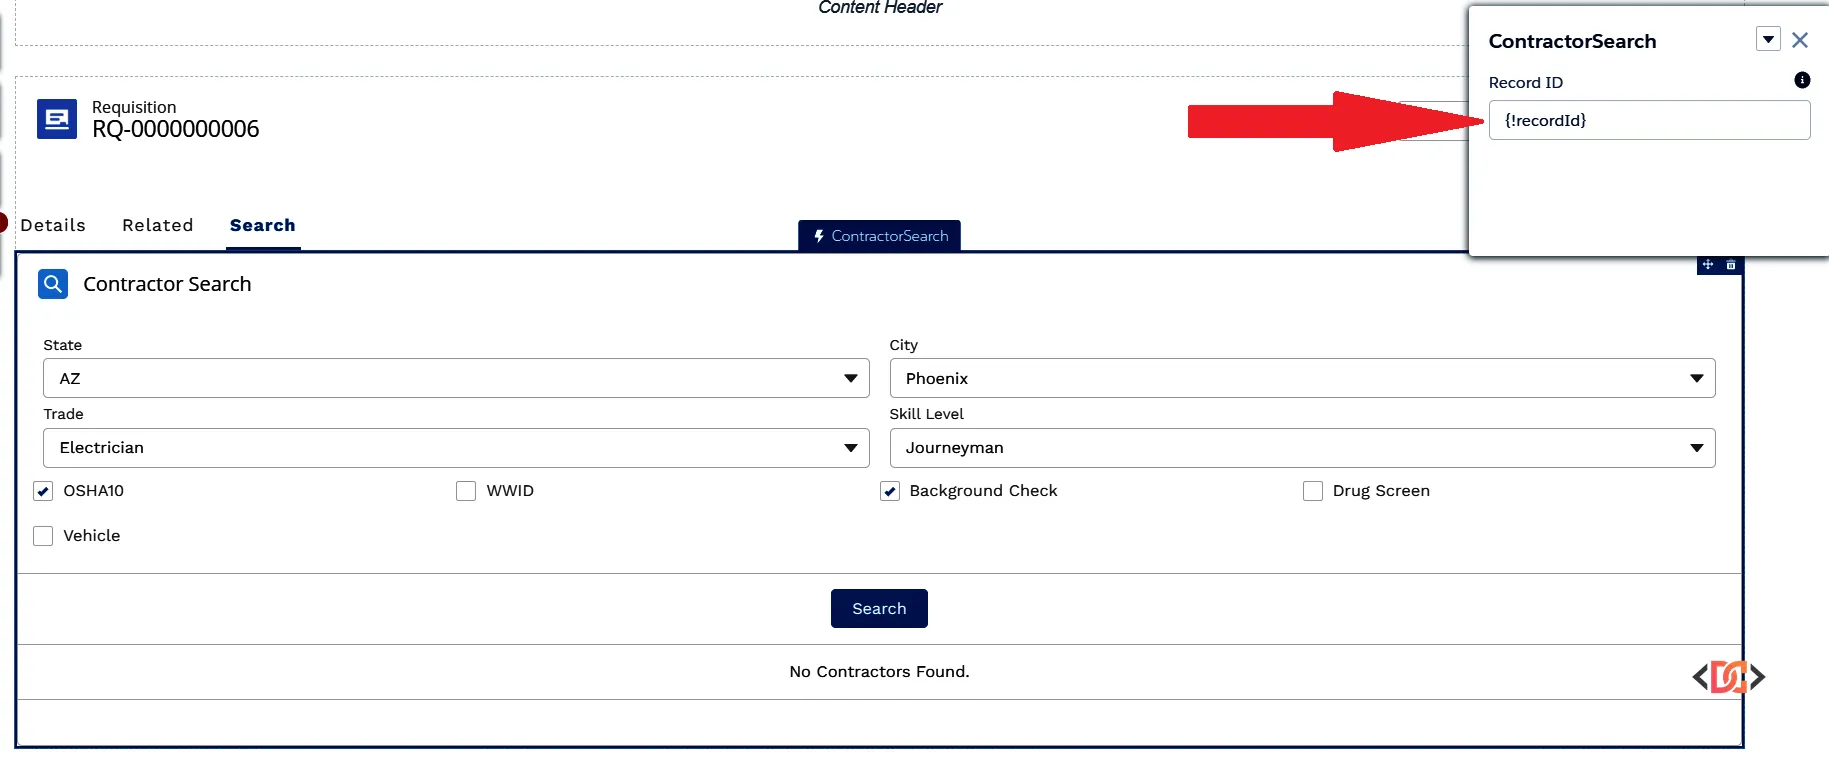
By entering {!recordId}, you are using a merge field expression that tells Salesforce: "Take the ID from the current URL/page context and pass it into this component's recordId property."
Why This Approach Works
In the internal Salesforce Lightning Experience, the framework handles the context automatically. In Experience Cloud, the framework is designed for flexibility. You might want to pass a hardcoded ID, a different URL parameter, or the standard record ID. By exposing the property and manually mapping it, you gain full control over the component's data source.
If you find that the ID is still not appearing, ensure that your community user has the appropriate Object-Level Security (OLS) and Field-Level Security (FLS) to view the record in question. Even if the ID is passed correctly, the getRecord wire will return an error if the user lacks permissions.
Frequently Asked Questions
Why is my recordId still undefined after setting the metadata?
Ensure you have actually entered {!recordId} in the Experience Builder property panel. Simply declaring it in the XML is not enough for Community pages; the manual mapping step in the UI is required to link the page context to the component.
Can I use this for custom objects?
Yes. The recordId property is a string and can hold the 15 or 18-character ID for any standard or custom object. Just ensure your metadata targetConfigs allow the component to be placed on the relevant object pages if you are restricting them by object.
Does this work in LWR sites as well as Aura sites?
Yes, this approach is standard for both Lightning Web Runtime (LWR) and Aura-based Experience Cloud sites. The process of mapping the property in the Builder remains the consistent way to bridge the gap between the page context and the LWC.
Wrapping Up
Retrieving the recordId in an Experience Cloud LWC requires a bit more manual configuration than standard CRM pages, but it follows a logical pattern. By exposing the property in your js-meta.xml and manually assigning the {!recordId} merge field in the Experience Builder, you can create robust, context-aware components for your users.
Key takeaways to remember:
- Declare recordId with the @api decorator in your JS file.
- Add the lightningCommunity__Default target and a recordId property to your metadata XML.
- Crucially: Manually map the property to {!recordId} within the Experience Builder UI.
- Always verify your community user's permissions if data is not loading despite a valid ID.